Giving Text a Motion Effect
Solution
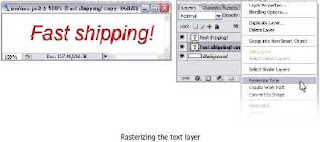
Create your text layer. Use an italic font to enhance the motion effect. Duplicate the
text layer using Ctrl-J (Command-J on a Mac). Right-click (hold Ctrl and click on a Mac)
on the original layer, and select Rasterize from the menu that appears.
Now we’re going to apply a filter to make the text look like it’s moving. Filters can
only be applied to raster layers, which is why we’ve rasterized our original layer.
Select Filter > Blur > Motion Blur to bring up the Motion Blur dialog. To make your text
look like it’s moving horizontally, set the Angle to 0°. Adjust the Distance to a value
that works with your text.
The Basics 1
Opacity of the motion layer in the Layers palette to fade
it out slightly, and used a layer mask to hide the righthand
side of the blur effect so that the text looks like
it’s moving towards the right. (If you need a refresher
on creating layer masks, see the solutions for “Fading
an Image into the Background” in Chapter 2.)
WARNING Raster Right!
.


click below link there is vimeo logo tranparent letter inside image
ReplyDeletei wanna design this type logo guide me help me teach me plz plz
vikash.shah23@yahoo.com
vikash shah
http://www.google.co.in/imgres?imgurl=http://newmediarockstars.com/wp-content/uploads/2012/07/vimeoLogo1.png&imgrefurl=http://newmediarockstars.com/2012/07/has-vimeo-lost-to-youtube-or-has-it-risen-to-something-greater/&h=420&w=420&sz=80&tbnid=drUFz3CRxOLGCM:&tbnh=93&tbnw=93&zoom=1&usg=__ehXgCWQ5Z5pS3cHoMX6mxtTu9Ik=&docid=rqxoq9DVf3NooM&hl=en&sa=X&ei=67XvUM_bK8emrAfyiYD4Bw&ved=0CDMQ9QEwAQ&dur=334