


The holiday season is fast approaching and people will soon be using Photoshop to create Christmas greeting cards, banners, and flyers. Most of them will probably want to create some pictures of Christmas decorations on those cards. This is a quick and dirty tutorial to get started with creating ornaments
The Magical Color Changing Christmas Ornament
I don’t enjoy doing something over and over. Repetitive tasks get boring so most of the time we should be reusing our work. The following tutorial shows how to make a Christmas Ornament graphic that you can quickly modify in a few seconds.
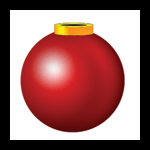
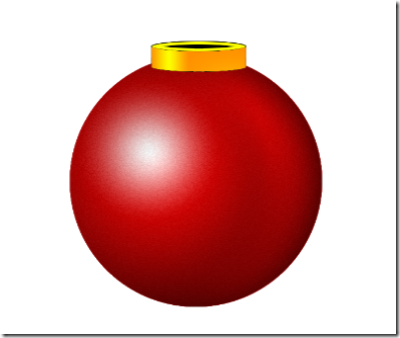
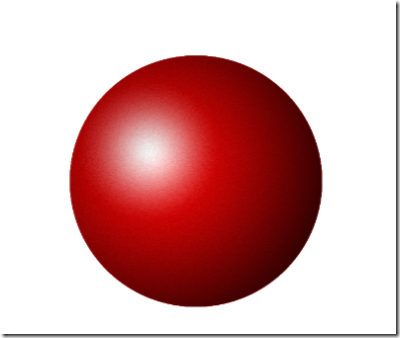
This is what the end product will look like:
Best of all, if you want to change the color you will just edit one layer and you’ll end up with a brand new Christmas ornament with out losing any of the cool effects.
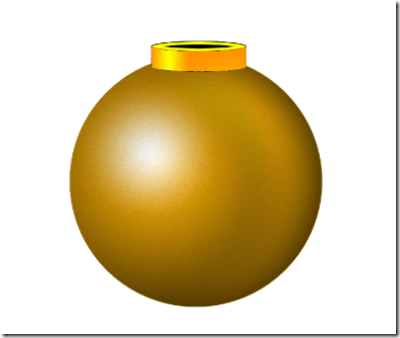
There.. that literally took 4 seconds.
Let’s Begin
1) Creating the base layer
Create a new image ( File > New ). Choose what ever settings you like. I chose the 1024×768 preset.
Create a New Layer. Rename this layer and call it “BASE”.
Choose the Layer called BASE by clicking on it in the Layers Palette.
Grab the Elliptical Marquee Selection Tool
If you hold down the SHIFT key and then drag then you will get a perfect circle. Do that now. Shift+click and then drag on your image. Make a nice round selection.
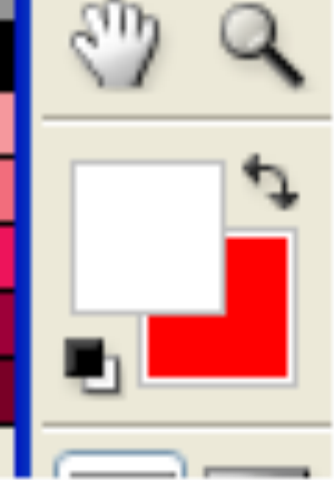 In your color picker, Choose WHITE as your foreground color. And choose RED as your background color.
Now grab the Gradient Tool ( G ) . When you choose the gradient tool you should notice that the top tool bar changes. You will see a Gradient Picker.

Click on that gradient picker area (in the screen shot above it’s the area with the red to black gradient. After you click on it you should see the Gradient Picker window. Choose Foreground to background. Then inside the circle selection make a diagonal line going from upper left to lower right. Keep trying until your circle looks like the following:
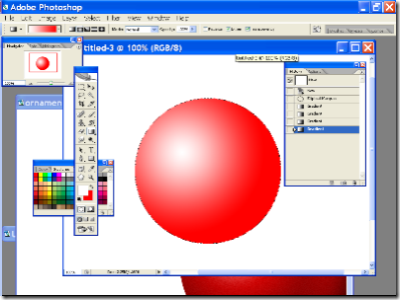
Next, go to Filter > Noise > Add Noise. I chose 6% noise, Uniform and Monochromatic.
2) Making it 3D-ish.
Create a new layer. Call it “3D effect”.
Choose the layer called “3D Effect”
CTRL+Click on the layer called “Base”. This will select the circle. Make sure that 3D effect layer is selected. Then go to Edit > Fill > Choose Color in the Use menu > and choose 100% Black as the color.
Now click on the Add Layer Mask button on the bottom of the Layers Palette.
Click on the black colored layer mask next to the 3d effect layer. Choose the gradient tool. Use a Foreground to Transparent gradient. Make another diagonal line inside the selected circle. Keep trying until you get something like this:
You may have to click on delete and try again until you get it looking like the image above.
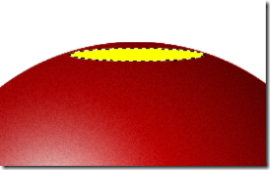
3) Making the Ring
Create a new layer. Call it “Ring”.
Make a small narrow oval selection on top of the orb and fill it with a color. I chose yellow. It should look like this:
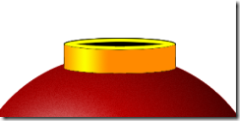
Choose the move tool.
Now press ALT and the up arrow. This will duplicate the selection and nudge it upwards.
Press up until the little ring is high enough.
And the end choose Select > Modify > Contract. Enter in a number like 3 pixels and then fill it with black.
You can also apply a reflected gradient on this ring.
You should end up with something that looks like the following:
4) Making the final Glow
Make a new layer. Call it “Glow”.
Control click on Base. This will select the circle.
Go to Select > Save selection. Name should be Circle 1.
Grab the marquee tool and click and drag the selection slightly to the left.
Now click on Select > Save Selection.
This time in the Channel drop down menu choose Circle 1.
Operation should be Subtract from selection.
Go to the channels palette and click on Circle 1.
You should see something like the following:
Go to Filter > Blur > Gaussian Blur. I blurred mine 34 pixels. This may be different for you depending on what size you are working with.
Control Click on Circle 1 channel and then go back to the Glow Layer.
Click on Edit > Fill and fill it with WHITE. Finally change the blending mode for this layer to Overlay. Move this layer until it looks good.
5) Changing Colors.
If you want to change the colors of this ornament just click on the BASE layer. Then go to Image > Adjustment > Hue Saturation. Move the Hue slider and the color of the orb will change. All the glow effects will remain.
If you want to download my PSD to check out all the layers then just click the following link:

0 comments:
Post a Comment