How to remove a background from a photo in Photoshop in this step-by-step tutorial.
Intro
Removing the background from a
photograph can be a really tricky task, particularly if the subject you
want to cut out has lots of hair, or if the background is exceedingly
complex. Here, we take you through the process of removing a background
from an image to help you overcome that challenge.
First, you'll need to open the image you wish to remove the
background from in Adobe Photoshop. Here, I'm using a photograph I took
of a giraffe at Colchester Zoo to demonstrate this technique, which has a
very defined boundary between the bit we want to keep (the giraffe) and
the background. For images with fine detail around what you want to cut
out – such as hair – see our tutorial on how to cut out hair in Photoshop.
I'm using Adobe CC, but the background removal technique detailed
here will work in Photoshop CS5 and above, though some elements may look
slightly different.
Once you've chosen the image you want to remove the background from
and opened it in Photoshop, use the slideshow controls above and right
to follow the remaining steps in the tutorial (if you're viewing this
site on a computer or tablet – if you're on a phone, just scroll down).
Time to complete
10 minutes
Software needed
Adobe Photoshop CS5 or later
Step: 1
Now, you'll need to make a selection.
To make a selection there are various tools you can use, but for
beginners, the easiest tools to use are the Quick Selection Tool and the
Magic Wand Tool. There's also the Lasso tool, which can be more
accurate but also take longer to use.
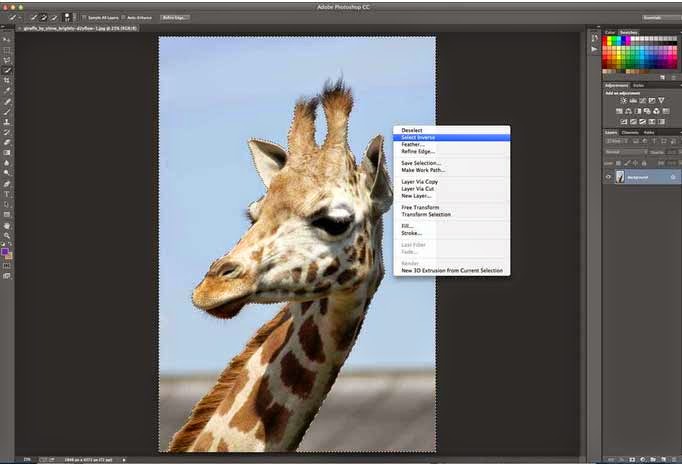
For this example, we're using the Quick Selection tool, which can be found in the tools panel.
Make sure you're using the Quick Selection tool with the '+' in the centre, by pressing the shift key.
Select the background that you'd like to remove by clicking and
dragging around the area. If you accidentally select something you
didn't want to, you can press and hold the alt key on your keyboard to
use the '-' Quick Selection tool and remove it from the selection.
Remember to press shift again before continuing to select more of the
background, though.
You don't need to be too accurate with things like hair and fur,
because you can refine the edge later (we'll come onto that in a
minute).
When you're happy with your selection, right click and then click 'Select inverse'.

 Posts
Posts


.jpg)